Cartridge Pleating 101
(This class was originally taught at Atlantian University 2/1/03.)
This is a basic cartridge pleating how-to class that I did for people who liked cartridge pleating and wanted to do it, but were intimidated by the logistics of hand-sewing pleats into place (say "hand-sew" to a machine sewer, and they get nervous). I created this class and hand-out to walk them through the process step by step, and show that it's not nearly as hard as it seems at first glance.
(I apologize for the Paint pictures; I don't have a scanner - yet.)
|
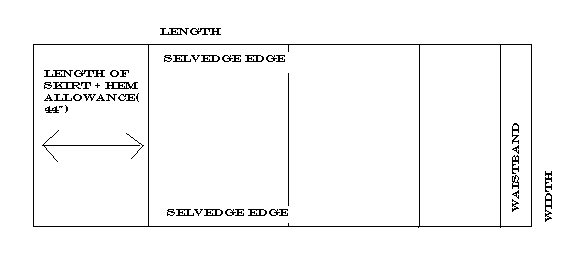
1. How Much Fabric Do I need?
In period, skirt lengths ranged from just brushing against the floor to right at the ankle for most people. Beyond that, the higher the skirt, the lower the class of the woman wearing it. The highest I can find a picture for seems to be the base of the calf muscle, and that's on a rural woman taking chickens to market. For most people, the skirt would stop at the top of the foot, and we'll use that measurement. Measure your length (or have someone else help you) from waist to foot, adding 2" for hem and seam allowance. To create a fuller skirt, multiply that number by 4. For a narrower skirt, multiply by 3. Add 18 for the extra waistband fabric, then divide that number by 36.
For example: With a 42" waist-to-foot measurement and a fuller skirt, add 2" for seam allowance = 44.
44 x 4 = 176.
+ 18 = 194
194 divided by 36 = 5.4
Rounding that up to the next half yard, you'll need 5 1/2 yards of fabric to make a full cartridge pleated skirt.
2. What Materials Should I use?
Fabrics easily available in period are best - linen, wool, silk. Next best are fabrics that approximate a period look - cotton velveteen, tight-weave rayon velvet, taffeta, bridal satin, crepe-back satin, light brocades in period patterns. Different fabrics will pleat differently - a stiff silk organza is going to stand out from the waist more than a light-weight handkerchief linen. Stay away from garish modern colours and obviously non-period patterns (especially printed patterns), and try not to be seduced by shiny metallics, since they don't look anything like metal fabrics in period. Don't use a brocade that has the rubbery backing used on upholstery fabrics - it will kill your sewing machine and hands, and will never drape properly. Look closely at pictures from your chosen country and era to determine appropriate colour and pattern choices; the more you study, the better your eye for fabric and design will become.
|
3. How do I cut the fabric?
Cut the fabric along the length of the yardage. There will be four pieces for the fuller skirt (Fig. 1). The smaller skirt will have three pieces, but the layout is the same.
|
 |
| Fig. 1 |
|
|
The best way to get a straight line is to make a small cut where you want to cut, then tear the fabric along the weave. This works well on natural fabrics like linen and cotton, but not so well on wool or artificial fibers. Where visible, cut along the grain of the weave. If that isn't possible, measure, measure, measure, and use a chalk pencil for accuracy. No-one can cut a perfectly straight line without some sort of guide.
For velvet, or any material with a visible nap, make sure you mark which way the nap runs - in period, they didn't care about this, but modern people do, so if you don't want to endlessly explain why the nap runs in different directions, mark the nap direction with chalk on the wrong side of the fabric (the nap should run down). If you don't care, or like explaining such things to people, go for it and be period.
4. How do I sew the pieces together?
a. Pin the pieces together widthwise (the selvedges will be the side seams), and sew them together, making sure as you go along that all the seams face the same way, and that the fabric doesn't get twisted (If you aren't careful, you can end up with a giant Moebius strip). On the last seam leave 8" at the top for the waistband opening. If you are making an open front (split) skirt, turn under the ends and hem (even though you have a selvedged edge there, turn it under. It will look shabby and unfinished if you don't). You don't need to zig-zag or serge the seams, but make sure you at least iron them flat, as this will make a difference to how the finished skirt looks. In period, the edges would have been stitched down with tiny stitches to make sure they stayed flat.
b. Iron the hem at the bottom of the skirt (the end without the opening), making sure you turn it twice so that no raw edges are showing. Sew (preferably by hand, but that's your choice) the bottom hem.
c. Turn under and sew down the sides of the waistband opening.
d. Iron the seam allowance at the top of the skirt, turning twice so that no raw edges are showing. It is not necessary to sew down the top; it will be fixed in place by the pleating, and no machine sewing will show.
e. Cut the waistband to your waist measurement (take your waist measurement in the shift/bodies/whatever you'll be wearing under the skirt) plus 2" for hemming (1" at each end). Sew the waistband into a tube, wrong sides together (Fig 2).
|
 |
| Fig. 2 |
|
|
Then turn right side out, iron flat, turn under the ends and sew down (again, by hand is better). The waistband should be completely finished before you start pleating.
5. Okay, now what about the cartridge pleating? Is it hard to do?
No, it's not hard, but it takes patience, and has to be done by hand to lie correctly.
a. Measure your finished waistband into four equal sections, and mark them with pins.
b. Measure the skirt panels into four equal sections and mark them with pins (with a four-section skirt, this is easy, but for any skirt, just fold in half, then in half again, and mark at the folds).
c. Thread a needle with a double length of strong thread (I use beeswaxed linen thread) that is a bit longer than your waist measurement (add about 10"). Stitch the top of the skirt in even stitches about 2" long through the turned-down edge.
d. Starting at the opening/end, line up the skirt and the waistband, right sides together, the top of the skirt against the bottom of the waistband (Fig. 3).
|
 |
| Fig. 3 |
|
|
Pin the marked skirt to the marked waistband, lining up the pins (Fig. 4).
|
 |
| Fig. 4 |
|
|
e. Pull the gathering stitches so that each skirt section is the same length as the waistband section it is pinned to and gathered into even pleats. Pin each pleat into place to that it is firmly fixed, making sure the pleats remain evenly spaced as you go. Work along the waistband, pinning section by section until the entire skirt is evenly pinned (Fig. 5).
|
 |
| Fig. 5 |
|
|
...Go to page 2 of Cartridge Pleating 101
|
|
